There are so many things we love about our tiny trailer kitchen – from the initial, factory-built design features to our specific-use modifications to the carefully curated collection of cooking gear we’ve chosen to fit our needs. Warning: our exact model may not be for everyone. However, if you are looking for innovative ideas for you own RV kitchen, you’re bound to find something to inspire you here. Extra bonus: I’ve sprinkled a few recipes and camping meal ideas throughout the post!
Disclosure: This post contains affiliate links. If you buy something from one of our affiliates, we receive a small commission at no extra charge to you. Thanks for helping to keep our blog up and running!

Table of Contents
Efficient Use of Space in Your Tiny Trailer Kitchen
Space is the number one issue for most RVers. Make sure you buy a trailer with a good-sized fridge. It is something you simply can’t work around. We love our fridge. When packed with care, it can hold up to four days-worth of fresh meal ingredients and even has a tiny freezer.
In any small RV kitchen – beyond fridge size – lack of prep area is the most common complaint. Simply adding a metal cover for the stove instantly creates more useable counter space. A wooden cutting board sink cover serves multiple purposes. It increases food prep area on the counter and can be used separately – inside or outside – as a cutting board, charcuterie board or serving tray. Love anything that has multiple uses!

Seeing Potential
Our little trailer didn’t come equipped with cupboards above the kitchen counter. We didn’t want to close in the space with a heavy wooden cupboard, so we opted to install a metal shelf. I chose lightweight, woven baskets to attach with Velcro on top of the shelf. These baskets hold melamine dinner plates, side plates, bowls, acrylic glasses, metal mugs and metal wine glasses. There is even a whole basket left over for extras such as our Aeropress coffee maker, a foldable dish-drying mat, a plastic tub for doing dishes outside and odd-shaped necessities like a roll of tin foil.

Limited space below the sink calls for innovation as well. We have a single large cupboard under the sink. Installing a sliding metal drawer allows us to store and reach all of larger cooking necessities – frying pan, pot, stovetop kettle, large metal mixing bowl, salad spinner/bowl, large plastic measuring cup with lid. We use our silicone hot pad as a protective layer when we nest the pot inside the frying pan to prevent rubbing. Bowls nest inside each other and there is just enough room for the measuring cup in front. The kettle rests on top. To the side, we store our flexible cutting boards.

We also rescued some unused space behind a tiny false front directly beneath the sink. It became the perfect cutlery drawer and spice holder with the addition of lightweight bamboo boxes – which gear guru guy – that would be Brad – rejigged to fit the space.

Meal idea: Appy night!
I love cooking while camping. Every once in a while, we like to pull together a mixture of sweet and savoury appetizers for dinner. We call it Appy Night! A few of our mix-and-match – and simple to prepare – favourites include:
- baby peppers stuffed with artichoke dip
- bacon wrapped dates stuffed with goat cheese and grilled on BBQ
- crackers topped with Boursin cheese and hot pepper jelly
- nachos
- domalthes (stuffed grape leaves)
- naan pizzas (see recipe ideas below)
- veggies and hummus (take it up a notch by drizzling hummus with a balsamic reduction – yum!)
- homemade bruschetta and toast
- Caprese skewers (mini mozzarella balls, basil leaves & cherry tomatoes drizzled with balsamic reduction)
- green apple and brie quesadillas
- olives, pickled asparagus, dry turkey pepperoni, cheese and crackers charcuterie board

Naan Pizzas
These single-serving sized wonders make a meal in themselves when not cut up to share for Appy night. Simply buy a package of naan bread and top with your favourite pizza toppings. You can cook them on the BBQ with a pizza stone or on the stovetop with an oven (see below) or carefully – watch for burning – with a covered frying pan.
Megan’s Favourite
Take one naan bread. Spread with basil pesto. Top with sliced artichokes (buy tins packed in water), halved cherry tomatoes, leftover cooked chicken, feta cheese. Bake until bread is crispy on the bottom.
Brad’s Fave
Take two naan bread pieces. Spread pizza sauce on each piece. Sprinkle with Italian spice. Top each with salami, diced red onion, diced zuchinni, diced mushrooms and mozzarella and/or cheddar cheese. Bake until cheese is melted.
Extending the Kitchen
Owning a rolling home is not the same as a brick-and-mortar abode. You can’t simply add on more square footage when you need more space. Well, technically, that’s not quite true! We do extend our space by taking the kitchen outside more often than not.
Beyond the indispensable small, portable barbeque – which fits nicely in the outside storage cubby – we carry a second two-burner propane stove. An adapter allows us to hook up to the front propane tank. My gear guru guy built a wooden shelf which is attached by two bolts and wings nuts to the metal fender. The stove sits nicely on top. A small metal folding table gives us room for prep and/or cooking ingredients. Our awning covers the entire space. We are currently having custom screens built for the sides to block the wind. Voila! Instant kitchen extension.

We like cooking outside of our tiny trailer for several reasons. One is the smell – especially if you like garlic and onions as much as we do! Another reason is space. We have a tiny footprint for our trailer kitchen. Only one person can be in the space at a time. Moving outside makes it easier to work around each other. And finally, cooking inside adds unnecessary moisture. Having the stove outside reduces that problem.
Looking for more ideas to extend small RV space? Check out our post on A Perfectly Portable Outdoor Shower!
Kitchen Cleanup Time
Our sink is small and counter space is minimal, but it all works. The table is right within reach – perfect for holding dirty dishes waiting to be washed. The dish-drying mat is within arm’s reach in the basket above. When we do dishes inside, the mat is placed on top of the metal stove cover to the left of the sink. We do have a plastic washing bin for times when we want to do dishes outside.
Gear guru guy mounted a metal cage on the wall behind the taps. It holds dish soap, dishcloth and scrubbie. Nothing moves and it is always accessible. The metal bracket holding the shelf above the sink serves double purpose as a dish towel holder. Washed and dried in the blink of an eye and dishes are easily stored back in their open baskets or below in the rollout metal drawer or cutlery drawer.
Get the Gear
We are minimalists at heart. You won’t find Insta-pots or blenders or waffle-makers on our list of must-haves for the trailer. Because we like to boondock and stay off-grid whenever we can, electrical appliances not only take up too much room in a tiny RV, they use too much power. As a result, our list of must-have kitchen cooking gear is quite simple. Everything must be lightweight, durable and – if possible – have more than one use!
Our list of kitchen basics includes:
- dish-drying mat
- long-handled lighter
- can opener
- vegetable peeler
- paring knife with sheath – crucial for saving finger reaching into a tiny utensil drawer
- MSR chef’s knife with sheath
- cutlery set for 4
- folding plastic spoon, grater & flipper – space savers
- small spatula
- GSI pivet tongs – more space saving
- flexible cutting boards
- plastic measuring cup
- large metal bowl – prep, baking and salads
- OXO mini salad spinner – clear plastic bowl good for salads and spinner useful as strainer as well
- 4-piece melamine dinnerware set – ours is a mix of pottery-patterned bowls & side plates, white dinner plates
- 4 acrylic glasses
- metal mugs
- metal wineglasses
- frying pan
- saucepan
- stovetop kettle with folding handle
- silicone hot pads – also protects nested pots and pans from rubbing
- Aeropress coffee maker – I like coffee + he likes espresso = we love this option!
Check out MEC for lightweight kitchen gear as well ⬇️

And finally, the Outback oven – read on for more about this gem.
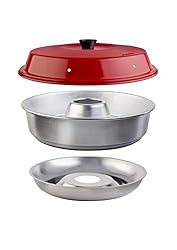
Baking Without an Oven in a Tiny Trailer Kitchen
I love our Outback Oven. It’s simple, straightforward and easy to store. The oven consists of six parts: a heat-diffusing ring, a 10” nonstick pan, a lid, a screw-on thermostat and a fireproof cover. The thermostat is a spring coil that moves a needle from Preheat to Bake to Burn. All of this fits snugly in a small mesh bag which we store underneath the bench seats since we don’t use it every day.

To use, simply put the heat-diffuser down on the camp stove burner. Put whatever you’re baking in the pan. Screw thermostat on top of lid and cover pan. Put fireproof cover over pan and lid. There is a hole in top of the cover that allows you to view thermostat. Adjust heat – usually as low as possible – to keep in bake zone. Baking times vary. Warning: it’s not speedy. Normally, when you start smelling the cake, buns or bread, they are close to done.
Sadly, our Outback Oven is no longer being made. But there are a couple of other good options. The Omnia Stovetop Oven works like the Outback Oven. The main difference is that the pan is a bundt pan with a hole in the middle. I haven’t used it but think this would make cooking faster and more even. The downside would be that everything you make has a hole in middle!
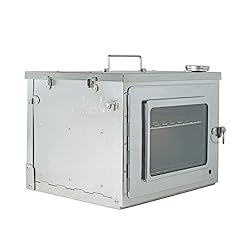
Another option for stovetop baking might be the Winnerwell Fastfold Oven. Again, I haven’t personally used this one, but it looks like a potential winner.
3 of Our Favourite Stovetop Baking Recipes
You can use store bought muffin and cake packages to cook in your stovetop oven if you don’t want to pack flour, baking soda and powder and all the other ingredients. But for us, it’s a little indulgence that makes the cake… or buns or bread! These recipes are super simple and we’ve even been known to take the oven and ingredients along on multi-day paddling trips.

Cookie Cake
Ingredients: ½ c. butter, ½ c. brown sugar, 1 egg, 1 tsp vanilla, ¾ c. oatmeal, 1 c. flour, 1 tsp baking soda, ½ c. craisins, ½ c. chopped pecans, ½ c. coconut
Directions: Cream butter and sugar. Add in egg and vanilla. Mix in oatmeal. Add flour and baking soda. Fold in craisins, pecans and coconut.
Baking: Spoon evenly into nonstick pan. Cover and bake until inserted toothpick comes out clean. Keep a close eye on temperature gauge to make sure it is in the “bake” zone. In my Outback Oven, it can take up to one hour to bake a cookie cake – but the tasty treat at the end is worth the effort!
Breakfast Cinnamon Buns
Ingredients: ½ c. cold butter, 2 c. flour, 2/3 c. milk, 1 tsp baking powder, ½ c. brown sugar, ½ c. raisins ½ c. chopped pecans, 2 Tbsp soft butter
Directions: Mix flour and baking powder in large bowl. Cut cold butter into flour mixture until pea-sized or smaller. Add milk and mix into dough. Spread out into a rectangle on floured cutting board. Spread soft butter over dough. Top evenly with brown sugar, raisins and pecans. Roll lengthwise. Cut into bun-sized pieces.
Baking: Place bun pieces in pan, cut side up. Cover and bake until dough is cooked. Baking time ranges from 45 minutes to an hour depending on how diligent I am with checking temperature gauge.
Cheesy Basil Bread
Ingredients: 1 pkg quick-rising yeast, 2 Tbsp honey, 1 Tbsp oil, 1 tsp salt, 2 c. lukewarm water, 4-5 c. flour, 2 Tbsp basil herb paste (Gourmet Garden), 1 c. grated Monterey Jack cheese
Directions: Put yeast, honey, oil salt and water in large Ziplock freezer bag. Let sit for 10-15 minutes. Add 4-5 cups of flour and zip bag closed. Knead until dough balls up. Set aside in the sun for 1-2 hours. Take out of bag and place on floured cutting board. Punch down and flatten. Spread basil herb paste over dough and top with cheese. Roll up.
Baking: Place cheesy dough roll into nonstick pan. Bake for approximately 45 minutes. Time will vary. Use smell to warn you when it is getting close to baked!
What is the one thing that you must have in your RV kitchen? What are your favourite camping recipes? Love to hear from you in the comments below!
Great article filled with interesting good information. Enjoyed the recipes, thanks for sharing.
Glad you enjoyed the post and recipes, Chris!
A very inspiring read even for larger RV owners. Some more great modifications by Gear Guru Guy!
Always happy to hear when a post inspires other RV owners!
Hi Megan,
We have purchased a prolite mini. I would like to follow your plan of the shelf with baskets above the sink and stove. Are there any issues with attaching things to the walls? Can you let me know what aluminum shelves you used? Thank you so much for all your inspiration.
Robyn
Hello! The aluminum shelf was from IKEA, but any lightweight shelf would work!